Using variables
Variables are used to store data, Custom Command supports two main types of variables: temporary and permanent.
Temporary
Temporary variables are usually deleted right after execution, can be accessed really easily, and are commonly used when editing data.
How to use them?
Temporary variables can also be accessed by typing their name prefixed by a dollar sign. For example: $name will return the value of the name variable.
Examples
1. Basic usage
In this example we will save information about Bob, and send a text with all the info in it:
// Save Bob's information
$let[name;Bob]
$let[age;23]
$let[job;cashier]
$let[workplace;a local supermarket]

// Send Bob's description
I am $name, and I am $age years old.
I work as a $job at $workplace.
Let's see what would be the output:

As you can see all the variables have been replaced by their corresponding values.
2. Saving function output
Variables do not always have to keep a fixed text or number, you may also include a function when defining a variable. Let's use temporary variables to save different parameters of a word command.
Command we are going to work on will be report command used in the following way:
!report [User] [Reason]
So we will use the following code:
/* Note:
    $user would interfere with the default $user function.
    We will have to use the $get function.
*/
$let[user;$message[1]]
$let[reason;$message[2+]]

$mention has reported $get[user] for $reason
Now, let's see what the output will be:

You can see all the message parameters have been printed out successfully.
Permanent
As the name suggests, permanent variables remain after execution. In CC, permanent variables can be attached to one of a few discord components.
- Server - one value for the whole server
- Channel - one value for each channel
- User - one value for every user
- Message - one value for each message
How to define a permanent variable
All functions used to define & access permanent variables follow the same naming convention:
$[action][vartype]Var
For example, to set a message variable, you would use:
$setMessageVar
Examples
Here are some examples of implementing permanent variables:
Where is the data stored?
Permanent variables are not stored within discord, they are kept in Custom Command's database. If you are concerned about privacy please refer to the Privacy Policy.
1. Server
Let's define a server variable called welcomeMsg containing content of a welcome message.
Now we will create a !hello command that will retrieve value of the variable we defined before.
$getServerVar[welcomeMsg]
Let's see if it works
2. Channel
As you are familiar with server variables, it's time to hop on to channel variables. Different channels may have different values of the same channel variable.
Let's define description channel variable for two channels, and let users read them with !channel command.
Now we will create a code that will send description of chosen channel:
$getChannelVar[description;$findChannel[$message]]
Let's see the output for two channels we set before.
You can see that different channels received different values of the same description variable.
3. User
Another type of permanent variable is the user variable. The same user variable can have varying values among different users, the same as channel variables.
This example will show user variables by creating an !aboutMe command that allows users to set their own description.
!aboutMe command
Let's start of by creating a command for setting a description

// Set the description to "aboutMe" variable
$setUserVar[aboutMe;$message]

// Send confirmation text
Your about me has been set successfully
Now two different members, Member and Steve, will set their descriptions:

Both users' descriptions have been saved to the description variable.
!profile command
Now let's make a command allowing users to check each others' profiles.

// Author embed field
$title[$username[$mentioned[1]]'s profile]
$thumbnail[$userAvatar[$mentioned[1]]]

// Load description from user var
$description[$getUserVar[aboutMe;$mentioned[1]]]
It's time to see if !profile command returns the correct descriptions
4. Message
If you read the previous sections carefully, you should already get the idea of permanent variables. Message variables work in the same way as other types do, but are attached to a single message.
Here we will make a nickname change request command, that will allow button handler to access requested nickname.
!nickChange command
Let's start by creating a command users will use to request nickname change. We want the command to:
- Load requested nickname
- Send request prompt to a staff channel
- Save the requested nickname, and author of the request inside a message variable

// Save requested nickname to $let variable
$let[requestedNick;$message]
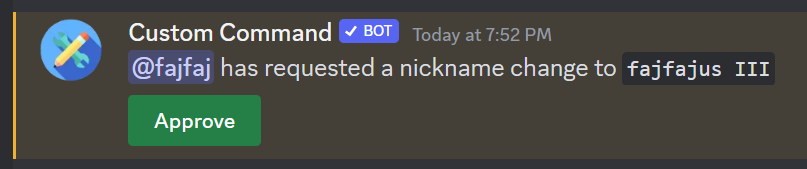
// Send a prompt to #staff
$channelSendMessage[$channelID[staff];
$mention has requested a nickname change to `$requestedNick`
{button:Approve:green::approve}
]
// Save the nickname in a message var (with a name of "nick") attached to the prompt message ($sentMessageID)
$setMessageVar[nick;$requestedNick;$sentMessageID]
// Store the requesting user
$setMessageVar[user;$authorID;$sentMessageID]
// Confirm submission
Your request has been submitted successfully, we will let you know once it gets approved.
Using !nickChange command will now send a message to #staff channel like this:
Approve button handler
As we have the proper message sent to the #staff channel, we have to make a command to handle the approve button.
Let's create a new command with button trigger.

The code has to:
- Grab the new nickname and requesting user from the message variables
- Change the nickname
- Notify user in the
#botschannel - Disable the approve button
// Save the new nickname to a $let variable
$let[nick;$getMessageVar[nick]]

// Grab the user ID
$let[usrID;$getMessageVar[user]]

// Change nickname
$changeNickname[$usrID;$nick]

// Notify the user
$channelSendMessage[$channelID[bots];
    <@$usrID> your nickname has been changed to `$nick`
]

// Disable the approve button
$disableButton[$messageID;approve]
Now the command will successfully grab the saved data, and use it to change user's nickname.

Message ID
It's worth noticing that in this command we did not provide any message ID. That's because the default value of the third parameter is $messageID which is ID of the message that triggered the command.
Server owner
Keep in mind that discord doesn't allow bots to change the server owner's nickname. If the server owner executes this command, the bot will reply with an error message.